Showing posts with label ride a bike shop. Show all posts

Tuesday, April 14, 2015

Men's Journal 2015 Best Road Bikes: Raleigh Tamland 2

2015 Raleigh Tamland 2: Amazing Gravel Bike


More people are looking to ride drop-bar bikes off-road, and Raleigh is catering to these gravel-loving cyclists with the Tamland 2. The Reynolds 631 Chromoly butted steel frame ensures a comfortable ride over less-than-ideal terrain, while Shimano Ultegra provides precise shifting. The Tamland 2 comes with TRP Spyre mechanical disc brakes, and clearance for wide tires. It's plenty capable for tarmac rides, but shines when the pavement ends.

  • Reynolds 631 Chromoly frame with gravel race geometry
  • Powerful TRP Spyre dual actuated mechanical disc brakes
  • Clement X'PLOR MSO 40c tires give maximum cushion and traction in bumpy gravel
  • Shimano Ultegra 11sp drivetrain
  • Weinmann KMAX Double wall rims with Novatec sealed bearing hubs


(from ridinggravel.com)
Ride Feel:

"The ride feel of the Tamland was immediately apparent within the first few miles. The feeling of smoothness was uncanny. I eventually pulled over to check the tire with a squeeze, fully expecting to find that I needed air, and me without a pump! The thing was, the tire was fine. The smooth ride feel continued in the front of the bike as well, showing that it wasn’t just the rear end of the bike, but the entire front end and the fork were working in concert to damp vibrations and mitigate bigger impacts."

Handling:

"So while the Tamland Two is smoother than most bikes, that doesn’t tell you much about whether or not the geometry is worth it here. In terms of handling on gravel roads, so far I think the Tamland is firing on all cylinders with this lower bottom bracket, slightly slacker head angle, and longer fork offset. Purposely pushing the bike into loose patches of gravel on my recent rides shows me that the stability necessary to keep the wheels underneath you and give the rider confidence that the bike won’t swap ends is there.

The bottom line though is this- The Tamland is the standard by which gravel bike specific design will be judged going forward. It is hands down the best handling bike on gravel I’ve ridden to date."
-Guitar Ted

Come in to Ride A Bike to see the full line of 2015 Raleigh bikes and much much more!

Ride-A-Bike Shop
116 NE. Court Square
Lincolnton, NC 28092
(704) 735-1746 

Thursday, April 2, 2015

5 Tips to Help You Bike in Style (As if You Needed The Help)

Melissa of Bike Pretty had Her Article Featured on Raleigh's Blog. Check it out!

Article and Photos from Bikepretty.com

Whether or not you bike to work, there are a lot of great ways to sneak a little bike time into your routine. Riding a bike doesn’t mean that you’re required to squeeze into a skin tight racing suit or pull on an old pair of athletic shorts, but that’s easy to forget when we think about biking only for exercise rather than as a fun way to get from Point A to Point B.


Personally I love fashion and can spend hours putting together the perfect look. But I still hate having to change clothes throughout the day just because I find myself doing different activities. Ideally, I would wear just one outfit that takes me to the office, client meetings, happy hour, and my commute. While this style of dressing is a little extreme and might not be practical for everyone, this self-imposed constraint has meant that I’ve learned a lot about how to bike in style.


Now that I’ve picked up a few tips, it’s actually pretty easy to pull off. Once you start, you’ll realize how it is simpler to dress for your destination instead of your ride, especially if you are heading out to see friends or meet a special date.


ONE slow your roll

While biking is excellent exercise, it can also be a lazy form of fast walking. A bike has this magical way of shrinking a fifteen minute walk into a five minute ride. That said, if you’re on your way somewhere and don’t want to arrive dripping sweat, remember not to push yourself. Slow down and enjoy the sights and sounds of your neighborhood. You might not make every light, but that’s all right. You’ll reach your destination without overheating and be ready to make a great impression.


TWO stow your layers

This is the best piece of advice I have ever heard regarding temperature regulation on a bike: if you’re warm enough during the first ten minutes of your ride, then you’re overdressed. It’s really true! A spring evening might still be “jacket weather” but don’t bundle up just yet. Bring your outerwear with you, but ride in your shirtsleeves.


After moving your legs for a few moments, you’ll start to feel warmer and you might even work up a little sweat. Going without a jacket gives your body a chance to regulate its temperature and also lets your clothes breathe so that you don’t feel clammy. And if you’ve found that you just couldn’t help yourself from attacking those hills and end up sweating through your shirt, once you arrive, you can still pop on your jacket and your sweat stains are hidden away.


THREE let your bike carry the load

A lightweight road bike that is stripped down to the essentials is great for weekend group rides in the countryside. But if you’re using it to get around town, you’re probably going to want to carry a little bit more than a water bottle and a few sport gels (or in my case chocolate bars).


As much as possible, avoid carrying heavy stuff on your back. Loaded up messenger bags and backpacks trap sweat against your body, wrinkle your clothing, and generally strain your back. A detachable pannier on a rear rack, a frame bag, even a handlebar bag that stows a quart of milk--or a bottle of wine--will go far in helping you ride in comfort. And if you don’t feel good, you won’t look good!


FOUR never without wet wipes

I don’t have a lot of must-haves for bike rides (besides lights, a lock, and the bike itself) but there are so many occasions when a well-placed wet wipe has saved my bacon. If you’re feeling self-conscious, you can wipe your armpits for a quick refresh. Use them to wipe the grease from your hands if your chain pops off. A small pack of 20 or so can be stowed discreetly under your saddle.


HELPFUL HINT: If you get bike grease on your clothes, squirt a little undiluted dishwashing or hand soap onto the fabric. Don’t add water. Instead work the soap into a lather until the stain has almost disappeared. Then rinse and launder as usual.


FIVE you’re never fully dressed without a smile

Whether you’re enjoying a serene rails-to-trails ride or biking home at rush hour, riding is just a lot of fun. Any day with a bike ride is a good day. Remember how much fun you had as a kid biking around the neighborhood? Even though you’re all grown up, it’s still just as much fun. So don’t forget to enjoy it!


www.rideabike.com

Ride-A-Bike Shop
116 NE. Court Square
Lincolnton, NC 28092
(704) 735-1746

Wednesday, March 18, 2015

TOP TEN BIKES - 2015 Raleigh Revenio 3 - A Lot of Bike for a Low Price


Whether you're chasing fitness goals or logging record miles, Raleigh's Revenio 3 makes it happen. 


WHY WE LIKE IT:
The hydroformed aluminum frame rides nearly as well as the more expensive Carbon Revenio frames. This Revenio 3 features the new 11 speed Shimano 105 drivetrain, carbon fork, FSA crank, and 700x25 tires for a comfortable ride. A lot of a bike for a low price.


The aluminum frame and carbon fork pair with an endurance-oriented, heads-up geometry so you can go farther, faster, and with more comfort. Fast spinning 700c Weinmann wheels come wrapped in grippy Kenda tires and are brought to life by Shimano's benchmark 20-speed 105 drivetrain. It boasts the light action, quick shifts and trademark durability perfect for seasons of riding. Top it off with a selection of great Raleigh parts, including a supportive Prologo Kappa saddle, and you've got a bike that's sure to please.


Frame AL-6061 Double Butted Custom Formed Tubing
Fork  Custom Carbon Composite w/Tapered 1-1/8" to 1.5" Alloy Steer Tube
Headset FSA Integrated Cartridge Bearings
Cranks FSA Gossamer Compact MegaExo 34/50t
Bottom Bracket FSA MegaExo External Bearing
F. Derailleur Shimano 105
R. Derailleur Shimano 105
Shifter Shimano 105 11spd STI, Shimano SP41 Shift Housing
Cogset Shimano 11spd (11-28t)
Chain KMC X11
Brakes Tektro R540 Dual Pivot
Brake Levers   Shimano 105 STI
Front Hub Formula Alloy QR 28h
Rear Hub  Formula Alloy QR 28h Cassette
Spokes 14g Stainless MAC
Rims Weinmann GMax Double Wall 23mm Wide
Tires Kenda Kountach Wire Bead, 60TPI, 700x25c
Handlebar Raleigh 200 Series Road, 31.8 Short Drop, 40/42/44cm
Grips Gel Tape
Stem Raleigh 200 Series, 7° 3D Forged, 31.8, 90/100/110mm
Seatpost Raleigh 200 Series, 27.2x300mm
Seat   Prologo Kappa EVO Satin Rail, 147mm wide
Colors Red/Black
Extras Rack and Fender Mounts


www.rideabike.com


Ride-A-Bike Shop

116 NE. Court Square
Lincolnton, NC 28092
(704) 735-1746


Thursday, March 12, 2015

Ride A Bike's Top Ten Bikes for 2015 - Raleigh Tokul 2

Variety is something to be embraced while riding off-road.

The 2015 Raleigh Tokul 2 is designed to attack both the ups and downs found on today’s newer bike specific trails. 


Why we love it:  
Mountain bike hard tail with lots of value for just $750. Trail geometry, hydraulic disc brakes, aluminum frame, and beefy Suntour fork.


With a roomy cockpit pedaling is made easy, while the longer travel fork and slackened geometry propel you down the trail. Versatile and playful these bikes are created to be more than your average hardtail. 27.5” wheels marry the benefits of 26” and 29er wheels. This tweener size is incredibly versatile in the varying conditions found on trails. It’s capable of rolling over rocks and roots with ease just like the larger 29er wheel, yet nimble in hard to navigate situations. These elements combine to make a wheel adept in any kind of terrain and in all conditions.

The AL-6061 used to construct the frame provides a durable and lightweight platform for trail use. Promax hydraulic brakes and Shimano drivetrain provide the functionality and dependability needed for off road use. You’ll find size specific wider bars and a shorter stems for increased maneuverability and handling. Spec’d with a Suntour XCR 32, 120mm fork rough terrain is ready to be conquered.


www.rideabike.com 

Ride-A-Bike Shop
116 NE. Court Square
Lincolnton, NC 28092
(704) 735-1746
www.rideabike.com

Friday, February 27, 2015

Ride A Bike Top Bikes 2015 Raleigh Misceo 2.0 - BEST SELLER

Our Most Popular Bike - For Riding in the Neighborhood or Doing 5-25 Mile Fitness Rides


Flat Bar, Disc Brakes, 700x38c tires.


The rugged Misceo 2.0 will change how you commute! No longer will your trip just be getting from point A to point B. Turn the city into your own personal playground with a Shimano 8spd drivetrain, quick Kenda tires with K-shield and puncture protection, and a city-commuter must-have: disc brakes.


www.rideabike.comRide-A-Bike Shop
116 NE. Court Square
Lincolnton, NC 28092
(704) 735-1746

Monday, February 23, 2015

2015 KHS SixFifty 700 Mountain Bike Review

SixFifty Team Pictured

Let the trails take you places you've never been before - or just cruise your favorite Saturday trail - on KHS' SixFifty 700. 


With a 6061 double-butted aluminum frame as the backbone, the 700 is nimble for the tech and light for the climbs. Up front, a Manitou Marvel Comp fork handles the chatter and occasional big hits so you stay in control all ride long.

Stan's provides the rolling radness with 27.5-inch wheels wrapped in Maxxis Ardent tires so you navigate rock gardens with ease and bite into the corners like a pro.

You'll need that responsiveness once the smooth SRAM X1 drivetrain gets you up to speed and provides the perfect gear for all the undulations of your day on the trail. The 700 is topped off with fine components like a Kore handlebar and stem, plus a comfy WTB Volt Comp saddle.

• Frame: 650B Alloy 6061 Double Butted custom formed TT & DT w/replaceable derailleur hanger, 1.5 Taper
• Fork: Rock Manitou Marvel Comp TS Air, 100mm Absolute plus dampening, Ext Rebound adj & Compression Adj to lock 1.5 Taper 15mm Axle
• Headset: FSA Orbit 1.5E Zero Stack, 1 1/8”x 1.5 Taper
• Rims: Stans Rapid 25 double wall 32H Tubeless ready
• Hubs: KT S/B Alloy Disc W/CNC Rotor Flange, 15mm Thru-Axle Front
• Tires: Maxxis Aren’t Race M329RU, 36/EXO/TR 27.5 X 2.2 120 TPI Folding Tubeless ready
• Spokes: 14g Black w/alloy nipples, 32x32
• Front Derailleur: N/A
• Rear Derailleur: SRAM X1, 11a X-Horizon, Type 2
• Shifters: SRAM X1 11a Trigger right only
• Chain: KMC X11L
• Crankset: SRAM X1, 1000 X-Sync, Forged GXP, 36T
• BB: SRAM GXP
• Cassette: SRAM XG-1180 10-42T 11-speed
• Pedals: N/A
• Seatpost: KHS Alloy micro-adjust, 31.6X350mm
• Saddle: WTB Volt Comp
• Handlebar: Kore XCD Riser, 710 x 15mm, 31.8
• Stem: Kore XCD, 3D Forged, 31.8mm (S:80mm, M:90mm, L:90mm, XL:100mm)
• Grips: Q2 Lock-on

• Brakes: Shimano BR-M506, Hydraulic Disc, 160mm Totors


www.rideabike.comRide-A-Bike Shop
116 NE. Court Square
Lincolnton, NC 28092
(704) 735-1746


Monday, February 16, 2015

Entry Level Road Bike - 2015 Raleigh Revenio 1 REVIEW

2015 Raleigh Revenio 1 - No Sacrifices


Endurance riders demand fast bikes that are comfortable enough to pedal for hours, the Revenio meets those demands.
 
The geometry has been updated with a slackened seat angle that shifts the rider’s center of gravity back and takes some weight off the handlebars. The result is reduced strain on wrists, elbows, neck, and lower back. Less fatigue translates into improved stamina and comfort.


  • All-new frame and fork
  • Lighter wheels with wider rims
  • Shimano Claris drivetrain
  • FSA compact crankset
  • Custom Raleigh components


Frame
AL-6061 Double Butted Custom Formed Tubing
Fork
Custom Chromoly Road 1-1/8"
Headset
FSA Integrated Cartridge Bearings
Cranks
FSA Tempo Compact 34/50t
Bottom Bracket
FSA Sealed Cartridge Square Taper
F. Derailleur
Shimano Claris


Shifter
Shimano Claris 8spd STI, Shimano SP41 Shift Housing
Cogset
Shimano 8spd (11-32t)
Chain
KMC Z82


Brakes
Tektro Dual Pivot
Levers
Shimano Claris STI
Front Hub
Formula Alloy QR 28h
Rear Hub
Formula Alloy QR 28h Cassette
Spokes
14g Stainless Steel
Rims
Weinmann GMax Double Wall 23mm Wide
Tires
Kenda Kriterium Wire Bead 700x25c
Handlebar
Raleigh 100 Series Road, 31.8 Short Drop, 40/42/44cm
Grips
Gel Tape
Stem
Raleigh 7° 3D Forged, 31.8, 90/100/110mm
Seatpost
Alloy Micro Adjust 27.2x300mm
Seat
Raleigh Comfort Road, 148mm wide


www.rideabike.comRide-A-Bike Shop
116 NE. Court Square
Lincolnton, NC 28092
(704) 735-1746


Friday, January 30, 2015

2015 Raleigh Tamland 2 XC at Ride-A-Bike


2015 Raleigh Tamland 2 Cyclocross Bike


The Tamland isn't just a 'cross bike with gravel tires. The Tamland is designed with everything gravel in mind. Whether you're at the start of your next gravel epic, or you're taking the long way home on the gravel road across town, the Tamland will track through everything beneath you like it is made from the very gravel it is carrying you over. The Tamland has plenty of clearance for tires, it will even take some MTB tires, and the longer chainstays provide a stable platform to keep you upright while you let the Tamland get loose on those gravel descents.


  •     Reynolds 631 Chromoly frame with gravel race geometry
  •     Powerful TRP Spyre dual actuated mechanical disc brakes
  •     Clement X'PLOR MSO 40c tires give maximum cushion and traction in bumpy gravel
  •     Shimano Ultegra 11sp drivetrain
  •     Weinmann KMAX Double wall rims with Novatec sealed bearing hubs


Frame:     Reynolds 631 Chromoly Custom Butted, Disc
Fork:     4130 Chromoly Cross, w/Disc Tabs, 1-1/8"
Headset:     FSA Orbit MX Sealed Bearing, 1-1/8"
Cranks:     Shimano Ultegra FC-6800, 52-36t
Bottom Bracket:     Shimano External
F. Derailleur:     Shimano Ultegra FD-6800
R. Derailleur:     Shimano Ultegra RD-6800, GS 11spd
Shifter:     Shimano Ultegra ST-6800, 11spd
Cogset:     Shimano Ultegra CS-6800, 11-32t
Chain:     Shimano Ultegra, CN-6800, 11spd
Brakes:     TRP Spyre Mechanical dual actuated disc, 160mm Rotors
Brake Levers:     Shimano Ultegra STI
Front Hub:     Novatec D711SB Alloy Sealed Bearing, Disc QR 32h
Rear Hub:     Novatec D712SB Alloy Sealed Bearing, Cassette, Disc QR 32h
Spokes:     14g Stainless MAC w/Alloy Nipples
Rims:     Weinmann Kmax Pro Double Wall 32h
Tires:     Clement X'PLOR MSO, 700x40c, 120TPI
Handlebar:     FSA Energy Compact, Reach: 80mm, Drop: 125mm
Grips:     CX Specific Bar Tape
Stem:     Raleigh 200 Series, 3D Forged, 31.8,
Seatpost:     Raleigh 2014 Alloy Dual Bolt 27.2x350mm
Seat:     Prologo Kappa Evo, 147mm wide
Colors:     Red
Extras:     Rack and Fender Mounts

www.rideabike.com

Ride-A-Bike Shop
116 NE. Court Square
Lincolnton, NC 28092
(704) 735-1746


Thursday, January 1, 2015

Happy New Year! Need A New Year's Resolution?

How About 7 Resolutions To Choose From?


#1 Lose Weight

Killing two birds with one stone has never been more fun. Cycling is ideal for weight loss because it burns tons of calories! Riding at a moderate speed (12-14 mph) you will burn approximately 235 calories per half hour!

Who said burning calories can't be fun? Even riding at a moderate 12-14 mph for half an hour will burn approximately 235 calories! Explore your neighborhood or local trails and get the benefit of exercise.

Just about everyone's New Year's Resolution list mentions something about shedding a few extra pounds. Why not have get fit and have fun at the same time? Cycling can burn upwards of 235 calories per half hour! Grab your bike from the garage or come in to see the many bikes we have in stock geared specifically towards your needs.


#2 Go on a Group Ride

Weather permitting, our shop hosts rides on Tuesdays at Pee Wee's Mountain Bike Park. Follow us on Facebook for updates


#3 Ride Before or To Work

Save gas and squeeze in extra training rides when you are crunched for time. Riding in the morning will speed up your metabolism too.


 #4 Clean/Maintain Your Bike


#5 Discover Roads Less Traveled


 #6 Commit To Stretching


#7 Take the Computer off your Bike

To mix things up, leave your bicycle computer or smart phone at home once a week. It can be way too easy to get sucked in to heart-rate numbers and mph averages. Ride your bike simply because you enjoy it. You'll have much more fun and be less likely to burn out before the end of the year.


#8 Support your local bike shop      :)


www.rideabike.com

Ride-A-Bike Shop
116 NE. Court Square
Lincolnton, NC 28092
(704) 735-1746
www.rideabike.com


Wednesday, December 10, 2014

Santa Can't Do Everything - Here are more gift ideas for Cyclists!

Have You Checked Everyone Off Your List Yet?


Chris King/Hope Pro II Evo
Hub set for custom wheels 
($385 and up)

We offer custom wheels based on Chris King and Hope Hubs. Come talk with us to get your next wheelset started.


Black Ops Nylo Pro - $57
High Traction MTB Pedals

This pedal offers a lot of traction at a great price


Drop Stop Chainring - $92
Wolf Tooth Components

This 30t chain ring is ideal for 1x10 drivetrain conversions. Come talk to us about conversion details.


Lezyne Power Drive XL - $120
Head Light and Helmet Mount


This is the perfect light for off-road night riding. Join us every Tuesday night at Pee-Wee's Mountain Bike park for a night group ride.

Wednesday, December 3, 2014

Pinkbike Awards: Trail / All-Mountain Bike of the Year Nominees

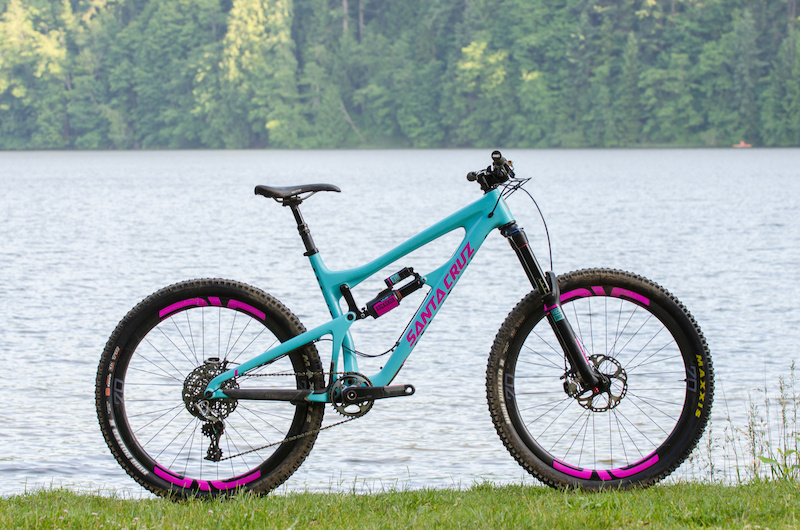
Santa Cruz Nomad Nominated For 

Pinkbike All-Mountain Bike of the Year

Santa Cruz drew from everything they'd learned over the past decade regarding geometry and suspension design in order to create the latest version of the Nomad, a bike with 165mm of travel that can tame the most technical trails on the planet while still possessing efficient pedaling and a light fighting weight, traits that help take the sting out of those long grueling climbs. To go along with its spot-on geometry, the Nomad's features read like a bike nerd's wish-list: a full carbon frame, complete with internal cable routing, a revised VPP suspension layout that tucks the lower link up into the frame and out of harm's way, space for a water bottle inside the front triangle, and on top of all that there's even a threaded bottom bracket shell. Santa Cruz absolutely nailed it with the Nomad, creating a bike that combines beauty and brawn into one outstanding ride

Ride-A-Bike Shop
116 NE. Court Square  -  Lincolnton, NC 28092  -  (704) 735-1746  -  www.rideabike.com

Friday, November 21, 2014

2015 Raleigh Ziva 27.5 - A Mountain Bike Just For Her


The Ziva is our 27.5" race driven hard tail designed specifically for women. 


Already race proven by our Raleigh sponsored riders Caroline Mani and Courtney McFadden, the Ziva is as ready as you are, whether your hitting the local MTB races, or are just ready to clear that elusive technical section on your favorite trail.


Trail-ready and gritty enough for everyday exploration, Raleigh's Ziva Expert opens up new shredding possibilities when the rubber hits dirt. A lightweight aluminum frame mates to a RockShox Recon Gold fork up front to create a responsive ride that's whippy and fun. Speaking of whippiness, the 27.5-inch wheels wrapped in Kenda rubber just beg for more whoops, whips, and roosts.


Of course, you'll need to get up to speed to have all that fun, so a SRAM X7 drivetrain gives you all the right gears and the smooth shifting to get you going fast. With all that speed, you'll need some reliable brakes, so Tektro Gemini hydraulic brakes are on the case. You'll shred this rig for years to come thanks to tough and reliable Raleigh components, a comfy women's-specific saddle, and grips and brake levers made specifically for feminine hands.


  • Lightweight women's specific alloy frame with XC geometry
  • 2x10 drivetrain with Sram Type 2 rear derailleur to keep chain noise down
  • Women's specific saddle, grips, and brake levers
  • Rockshox Recon Gold TK 100mm fork with lockout
  • Tektro Gemini hydraulic disc brakes with 2-finger women's specific levers


www.rideabike.com 
Ride-A-Bike Shop
116 NE. Court Square
Lincolnton, NC 28092
(704) 735-1746
www.rideabike.com


Thursday, November 13, 2014

The Rainy Cyclocross Season Is Coming Quick - Master the Mud

4 Tips On How To Master the Mud


Ride partners will appreciate it if you ride with fenders when it's muddy. Besides keeping the spray out of their eyes, fenders will keep it out of your peepers and off your clothes, too. Best, they'll keep the muck off the bike, somewhat reducing cleaning time and limiting the wear and tear on the finish. We can show you some fenders suited to the mud.

Don't Muddle The Puddle
When riding in muddy conditions be careful at puddles. It may seem fun to blast through, but it's never a good idea because you can't be sure what's at the bottom. If there's a hole there, you'll end up doing a sweet Superman imitation and sail over the bars when your front wheel gets stopped cold. This will entertain your ride partners immensely but it can be quite painful and could wreck the fork and frame if you're really unlucky.

Our recommendation? Slow way down and try to skirt the edges of puddles so you know you're passing over solid ground.

Wheelie Across
If you're coming into a muddy section that's only a yard or so across, but still looks like it could cause a loss of control, try this technique (this requires being able to lift the front wheel; if you don't know how, learn before trying this move): as you approach the bog, lift the front wheel and hold it up, until it's over dry ground. If you do this correctly, the front wheel will miss the mud altogether and the rear wheel will cruise through the muck. Because your front wheel is airborne as you cross the goo, there's no chance of getting the front end stuck and getting launched.

Ride It Out
Another important mud maneuver is hanging on a little longer when things seem out of control. Often, if you can just ride out the initial unsteadiness you feel, the bike will regain control on its own. It helps to stay off the brakes and remain relaxed.

Dodge The Danger
Keep in mind that no one is forcing you to ride through the mud. If it looks risky, the best bet may be to get off and walk around the muddy section. There's nothing wrong with that and you'll have the last laugh should one of your buds bury their front wheel and auger in!


www.rideabike.com 
Ride-A-Bike Shop
116 NE. Court Square
Lincolnton, NC 28092
(704) 735-1746
www.rideabike.com

Tuesday, November 4, 2014

Do You Want To Build Your Own Custom Groupset? Here's How.


Mixing Groupsets: What Works Together and What Doesn’t   

by Matt Wikstrom - October 20, 2014  www.cyclingtips.au 

With three major groupset manufacturers, transmissions of anywhere from seven- to 11-speed, and an excess of aftermarket cranksets and wheels on the market, consumers will inevitably suffer from a clash of component compatibilities, particularly when upgrading. In this post CTech Editor Matt Wikstrom takes a look at the known incompatibilities between groupsets from different brands (and within the same brand) along with some emerging compatibilities.

Once upon a time, cyclists were free to mix and match transmission components but that all changed when Shimano introduced indexed gear shifting in 1984. The new system provided very accurate shifting, but it depended upon precise compatibility of the shifter with the derailleurs and drivetrain.

Indexed shifting works because the rear derailleur travels a precise distance in response to a pre-set amount of cable pull within the shift lever. Cable tension is critical for accuracy, but the geometry of the derailleur and the cog spacing must match the indexed cable pull, otherwise the derailleur will not align with each cog.

Shimano, Campagnolo, and SRAM all manufacture indexed shifting systems according their own specifications rather than sharing a common standard. For example, SRAM levers employ 1:1 actuation (1mm of cable pull moves the rear derailleur 1mm) while Shimano and Campagnolo use higher ratios (1.4 to 1.9:1).

As a consequence, there is little interchangeability between brands (though Shimano and SRAM share the same specifications for the chain and cassette).

The evolution of the transmission from six-speed to 11-speed created further incompatibilities. The introduction of eight-speed systems depended on an increase in rear hub width from 126mm to 130mm to accommodate the extra cog. After that, the width and spacing of the cogs was reduced to allow more cogs to be added. Chains were narrowed too, slimming down to 5.50-5.90mm where once they were 7.80mm.
Forwards or Backwards Compatibility?

As a rule, mixing and matching different transmissions from one brand will not work due to changes in cog spacing. Brands will likely not support mixing components either. There are some exceptions though such as Shimano’s earlier groups and its Di2 E-Tube system.

So where do the compatibilities lie? For the purposes of this article, I’m going to limit myself to 10- and 11-speed transmissions. Where possible, I’ve tested the compatibilities for myself, but there’s no guarantee that you’ll be satisfied with the performance of a given mix of components until you carry out the experiment for yourself.


Chains and Cassettes

According to Leonard Zinn’s testing, all 11-speed transmissions are compatible. A comparison of a Campagnolo 11-speed cassette with a Shimano equivalent demonstrates that the cog spacing is well matched. However, there is a measurable difference in the width of each company’s 11-speed chain (Shimano’s chain is 5.62mm wide, Campy’s is 5.50mm).

In practice, the measurable differences account for little and a Shimano 11-speed cassette works well with a Campagnolo groupset, and vice versa. Neither combination is perfect though. The imperfections express themselves in the form of a little extra chain noise and/or occasional lazy upshifts for some, but not all, of the rear cogs. Overall, the compatibility is more than adequate in most circumstances, though not all users (or fussy mechanics) will be satisfied.

For 10-speed users, there is also reasonable compatibility between Shimano/SRAM and Campagnolo. While the chains are almost identical in width (Shimano’s chain is 5.88mm versus Campy’s 5.90mm), Campagnolo employs variable spacing* that leads to some extra chain noise and lazy upshifts that is more obvious than that seen for 11-speed transmissions. Regardless, the compatibility is more than adequate in an emergency, but the mix is unlikely to satisfy all users.

Updated by the Author: "The variable spacing applies to the cogs in Campag's 10-speed cassettes. So when a Shimano freehub/cassette is installed with a Campag transmission, the derailleur does not shift precisely to the next Shimano cog, making for a little extra noise or lazy upshifts. The chain is not the issue, it's the difference in the placement of each cog (and the indexing of each shift) between Shimano and Campagnolo that creates the incompatibility."

Attempting to mix 10- and 11-speed cassettes will cause significant problems due to differences in cog spacing and/or the width of the cassette. For Shimano/SRAM, 11-speed cassettes are too wide to fit properly onto 10-speed freehubs, and 11-speed chains are a little narrower (5.62mm versus 5.88mm). In contrast, Campy’s 10- and 11-speed cassettes will fit onto the same freehub body, but the 11-speed chain is significantly narrower than the 10-speed chain (5.5mm versus 5.9mm).
Chainsets

Owners of 10-speed chainsets fitted with power meters will be pleased to hear that there is no strict need to replace the chainrings if they upgrade to an 11-speed transmission, at least if they’re using Shimano or SRAM.

I’ve seen many people use Shimano or SRAM chainsets with Campagnolo chain and cassette and vice versa. FSA recommends strictly matching its chainrings to the transmission, as does Campagnolo, though anecdotal evidence suggests there is little to worry about. Indeed, I couldn’t detect any issues after swapping 10- and 11-speed Campy cranksets between their respective groupsets, though the 11-speed crankset offered slightly better shifting onto the big chainring.


Hubs and wheels

As mentioned above, Shimano/SRAM users will need an 11-speed freehub body fitted to their hubs/wheels in order to upgrade to an 11-speed transmission. Owners of Mavic wheels needn’t worry though; their 10-speed freehub bodies are already 11-speed compatible.

Many manufacturers offer conversion kits for their wheels/hubs, although there are instances where there are none (e.g. Zipp wheels with silver hubs). In such instances, owners may be able to install a Campagnolo freehub to use an 11-speed cassette if they can’t afford to replace the hub or wheel.

A more subtle incompatibility exists between different brands of hubs, since they can differ in the positioning of the freehub body on the rear axle. Such differences arise due to variations in the spacing of the right-hand hub flange and/or the spacing of the right-hand axle locknut. As a consequence, the rear derailleur limit screws have to be reset when swapping wheels to ensure crisp shifting onto the smallest and largest cogs.

If you own more than one set of wheels with different brands of hubs, then it is worth fine-tuning the axle and/or cassette spacing for perfect interchangeability.
Shifters and Derailleurs

As the brains behind the operation, each brand’s shifters must be matched with their own derailleurs, especially the rear derailleur, in order for the indexed system to function properly. As noted above, there is little or no backwards or forwards compatibility for Shimano, Campagnolo, or SRAM. It is possible to cheat with the front derailleur since there is more tolerance for variation in shifting but as the least expensive component in a groupset, there is little to be gained by leaving it out when upgrading your transmission.


Brakes

Shimano recently overhauled the cable pull and leverage of its brake levers so they are no longer compatible with earlier calipers (e.g. mixing Dura Ace 7900 levers with 7800 calipers results in less braking power). The re-design introduced more leverage to the calipers such that SRAM or Campagnolo levers pair poorly with the new caliper design (due to too much leverage).

The issue gets a little murkier with aftermarket brakes where there is very little information on their performance with different levers. At present, it appears Campagnolo and SRAM road brake levers enjoy greater compatibility with one another’s brake calipers and aftermarket brands than Shimano’s latest design.
Summary and Final Thoughts

With all the potential for incompatibility, it’s perhaps surprising that instances of compatibility do exist. Indeed, the divide between the brands has narrowed with the introduction of 11-speed transmissions, probably because there is a lot less room for variation.

In absolute terms, 11-speed Shimano/SRAM and Campagnolo chains and cassettes aren’t interchangeable, but I’m sure there are plenty of riders that will be satisfied with the performance offered by a mix. Similarly, 10- and 11-speed cranksets are practically interchangeable amongst brands, although brake calipers and lever/shifters may not be.

Would there be any benefit to a common standard for all groupsets? Absolutely. Consumers would find it easier to replace any part at short notice, retailers would be able to offer more options to their customers, and service centres would be able to attend to all repairs and servicing in a timely manner.

However, such convenience would come with the risk that product development would be slowed down or hindered by an out-dated standard. On balance, I’m happy to accept the exclusivity of groupset design because it guarantees unique and distinctive products.


www.rideabike.com 
Ride-A-Bike Shop
116 NE. Court Square
Lincolnton, NC 28092
(704) 735-1746
www.rideabike.com

Tuesday, October 28, 2014

9 Easy Steps to Quiet Down Your Noisy Rim Brakes (with pictures)

 Squealy rim brakes? These tips will help quiet them down. 

(Tips and photos from Bikeradar.com)

The following tips will hopefully explain and illustrate some of the principles involved for the three main types of rim brakes commonly seen. The most important principle affecting noise is the angle of the pad relative to the rim: generally, the front must come into contact before the rear – known as ‘toe-in’.

Tools

  • 4, 5, 6mm Allen keys
  • Adjustable spanner
  • Abrasive block by Mavic or light sandpaper
  • 10, 11, 12, 13, 14mm offset brake spanners
  • 8, 9, 10mm Y-wrench
  • 0mm box end/open ended spanner

1. Clean-up act
If your pads still have a fair bit of material, you’ll need to clean them first. Wipe them off with a bit of damp cloth and check the wear indicator, usually a line about 2mm from the backing edge. If they’re worn beyond this mark, you should replace them. The pad will sometimes have developed a ridge along either the lower edge, which indicates that it’s set too low, or the upper edge, which could indicate it’s too high and risks wearing through the tyre over time. Using a coarse half round file or emery cloth, roughen up the surface, making sure to remove all signs of shiny hard glaze. Remove the pad first to improve access if required.


2. Rim in trim

The condition of the rim surface can have a great effect on braking and noise levels. Most rims now have a machined or heavily scored surface when new. This has gone a long way to reducing the need for masses of toe-in, but as this rough surface becomes re-polished, squealing can occur. Not only can pads get glazed, but so can rim surfaces. Removing pieces of embedded aluminium will keep the scraping noise down; you might have noticed little raised dots of metal which form through braking and deposit themselves on both the rim and pads. Use a Mavic abrasive rubber block or coarse emery cloth and wipe clean. Carefully remove embedded aluminium from the pads.


3. Pad points

Concave and convex washers provide rotational adjustment in all planes, and are included on many aftermarket pads which can be fitted to side-pulls, dual pivots, V-brakes and cantis. Kool-Stop popularised offset pads, which were orientated in such a way that more force was exerted at the front of the pad than the rear, minimising the need for substantial amounts of toe-in while simultaneously curing squashy brakes and squealing. In the late ’80s, Shimano introduced offset pads orientated with the long edge forward. Where possible, short edge forward is less prone to noise, but be sure the closed end of the metal pad holders is always pointing forward.


4. Snug and secure

First tighten the main fixing bolt to ensure the calliper is firmly attached to the frame. This will be a 6mm recessed nut with a 5mm Allen head, or an older style non-recessed 10mm hex head, preferably a nylock nut (with a nylon insert to prevent the nut working loose). Using a brake spanner or cone wrench on the back adjuster nut, release the front lock nut, tighten the adjuster nut enough that the arms don’t deflect under braking loads, while still moving freely, allowing snappy lever return. Re-tighten the lock nut against the adjuster nut. On some dual-pivot brakes, check the exposed pivot bolt, if any – it’s usually a 4 or 5mm Allen. Tighten firmly while retaining movement.


5. Side-pull toe-in
With the advent of concave/convex washer systems, toe-in adjustment achieved by bending the calliper arms has become pretty much obsolete, but among bikes being dusted off and taken out of the shed there’ll be a few skinny Weinmann side-pulls getting a second chance at glory. Bend the arm inward at the front – we used a Park tool that’s now discontinued, but you could use a small adjustable spanner positioned to grab the arm in a similar way. On current dual-pivot brakes you’ll often get a set of concave/convex washers making toe-in easy; if yours are slightly older and don’t have them, install some that do. Tighten pads firmly so they can’t be moved or twisted by hand.


6. Baggy pivots
Minimising flex and vibration is the main goal of this anti-noise exercise, so checking that the pivot mechanisms and bolts are tight is critical. V-brakes and cantis are attached to the frame posts using a 6mm bolt, usually Allen but occasionally with a 10mm standard head. The brake arm either rotates directly on this pivot, using a brass bushing on older cantilevers, or incorporates an integrated pivot system which displaces wear from the frame post to its own internal mechanism, shared by modern Vs and cantis. This will also include a spring and adjustment screw, which add mechanical complexity and wear possibilities. Replace if the arms are really baggy, and/or if any toe-in of over about 3mm is lost through play in the arm.


7. V-brakes
Toeing-in V-brake pads will require, in most cases, a 5mm Allen key. In some instances, the pad will use a nut on which you can use a 10mm Y-wrench; it will often incorporate an internal 5 or 6mm Allen fitting. One technique suggested by some of the pad manufacturers for setting toe-in is to insert a small piece of folded card between the trailing end of the pad and the rim. This will keep the rear part of the pad further away as you tighten the nut, and can be useful if you’re having trouble holding the pad in place by hand. Having the spring unhooked on both sides can also make life easier when positioning pads. Bring the pads against the rim to check they’re at the correct height, and then tighten firmly.


8. Canti correcting
\

If your cantilever brakes have an external return spring then it can be easier to position the pads if you unhook the spring first; the arm won’t then fight you as you’re trying to line up the pad against the rim, and fine tuning will be easier. To toe in the pad use a 10mm spanner to immobilise the brake pad mount, then loosen the front nut using a 5 or 6mm Allen key. Some designs reverse this configuration or even require two 10mm spanners. When setting up the pads, leave roughly a 2mm gap at the back of the pad. If the pad keeps moving back into its previous position, try rotating the washers and clamping the pad either a little higher up or down the arm, to avoid the old marks left by the previous setting.


9. Swap brake type
Cantilever brakes can be tricky to silence, especially on skinny steel touring forks which are more prone to flexing. One thing that doesn’t help is a design that favours noise-making, where the brake pad post clamp sits way out in front, forward of the arm and mount. If you’ve tried everything to stop the squealing and still no joy, you might have to resort to a different design altogether. One to consider would be the inboard type pictured here, which seems to squeal less; both Ritchey and Avid offer this more compact design. Compare the forward type pictured in step 8 above with the rear mount design pictured below, which minimises flex in the brake arm, reducing the likelihood of high frequency vibration.

Them's the brakes


Brake squeal is caused by vibration, as that’s a fundamental requirement of generating sound (unless you’re riding in a vacuum). Vibration between the rim and pad can be caused by many things, but is most commonly a result of the interface between the pad and the wheel rim. Sorting your brakes out using all of the steps above will make sure your brakes are as good as they’re going to be, but there’s no hard and fast rule that will guarantee that you still won’t be getting brake squeal. The most common remedy, and often the quickest, is to fit a new set of brakes pads to freshly cleaned rims.

Dual compound pads can help to reduce the chance of the dreaded brake squeal coming back. The harder section of the pad gives slightly less friction than the softer sections and also serves to clean up the rim as you use your brakes. This kind of pad gives the best of both worlds: plenty of performance when you really haul on the anchors and clean rims for smooth, squeal-free braking.

www.rideabike.com 

Ride-A-Bike Shop
116 NE. Court Square
Lincolnton, NC 28092
(704) 735-1746
www.rideabike.com